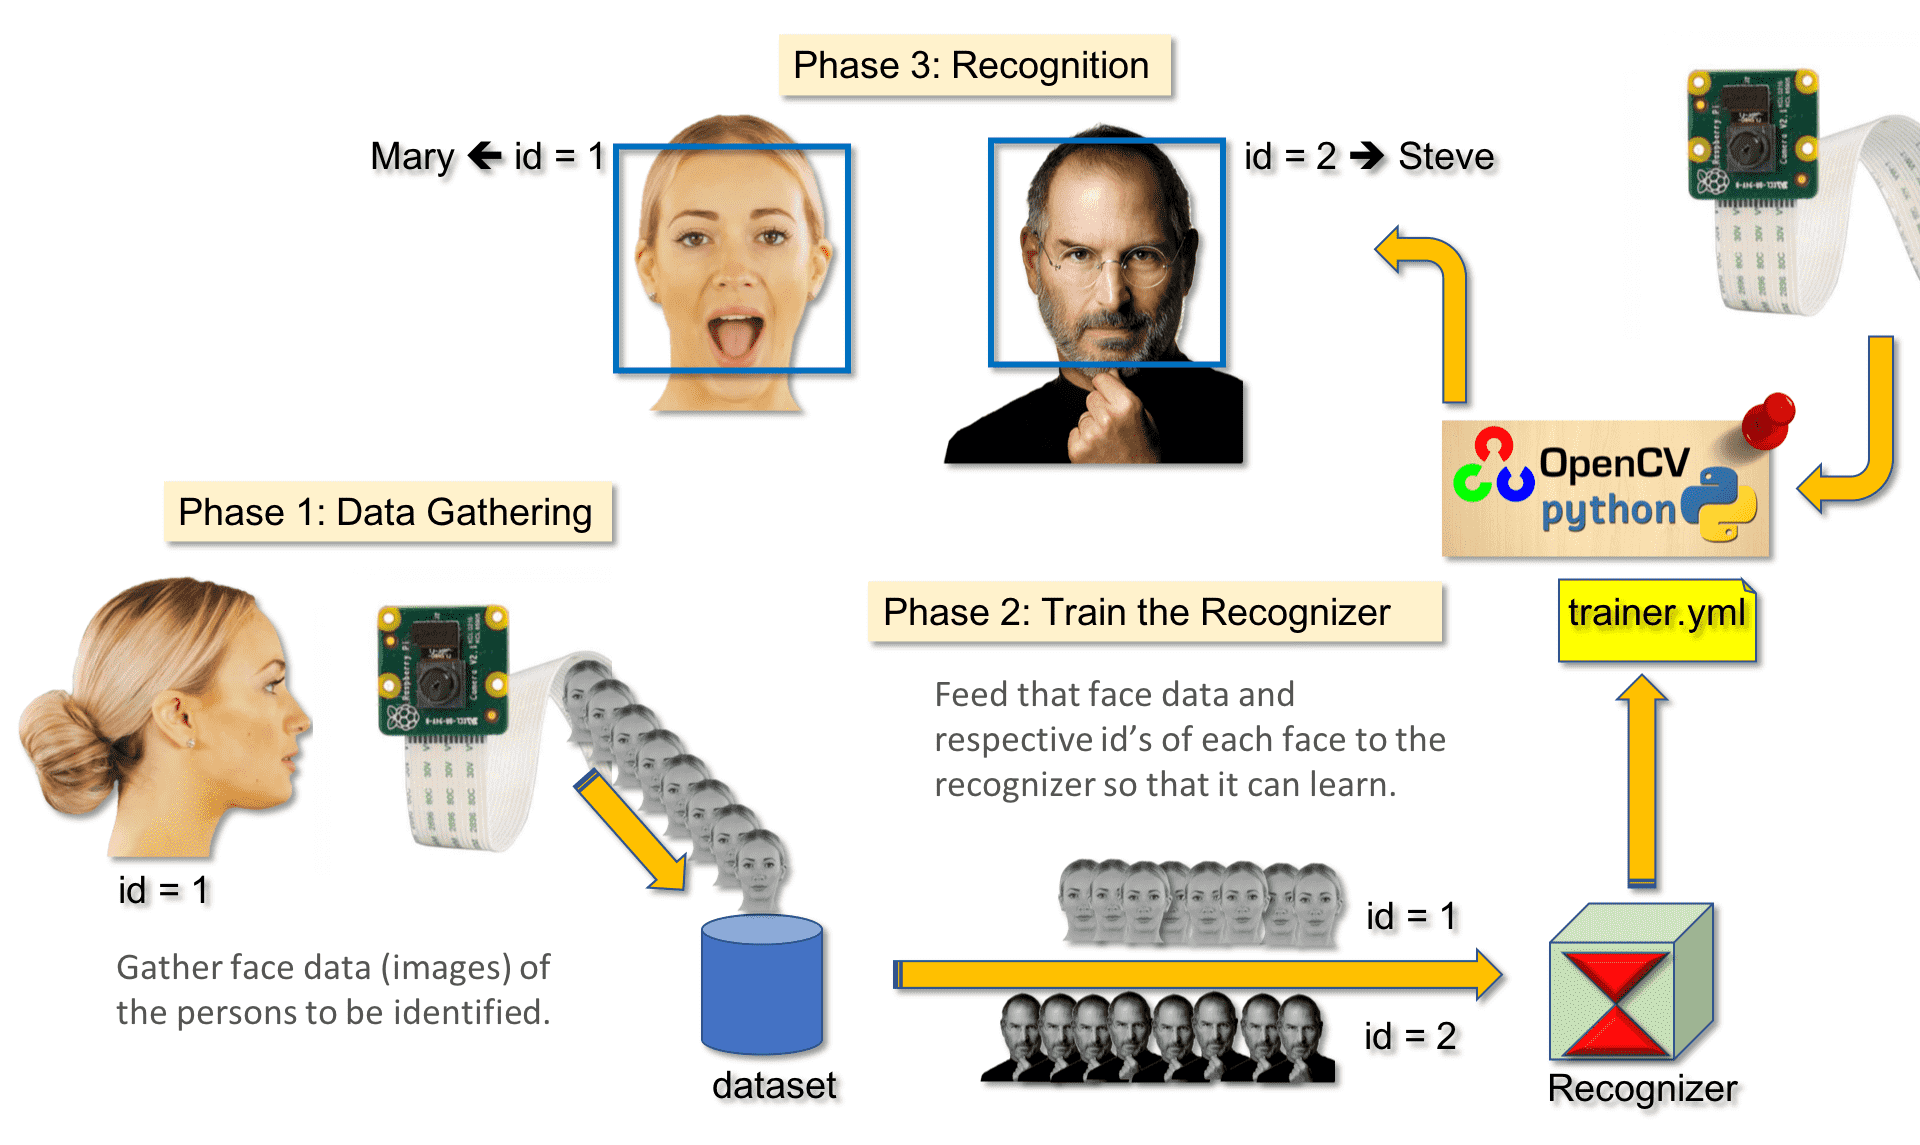
1、目录结构
1
2
3
4
5
6
7
| OpenCV_Facial_Recognition/
├── 01_face_dataset.py
├── 02_face_training.py
├── 03_face_recognition.py
├── haarcascade_frontalface_default.xml
├── dataset/
└── trainer/
|
先创建输出目录:
1
| mkdir -p dataset trainer
|
2、采集人脸样本
01_face_dataset.py 使用摄像头读取画面,Haar 分类器定位人脸,将灰度人脸区域保存为:
1
| dataset/User.<person_id>.<sample_id>.jpg
|
课程源码中的采集流程:
1
2
3
4
5
6
7
8
9
10
11
12
13
14
15
16
17
18
19
20
21
22
23
24
25
26
27
28
29
30
| cam = cv2.VideoCapture(0)
cam.set(3, 640)
cam.set(4, 480)
face_detector = cv2.CascadeClassifier("haarcascade_frontalface_default.xml")
face_id = input("\n 请输入用户ID,然后按 <回车> 键 ==> ")
count = 0
while True:
ret, img = cam.read()
img = cv2.flip(img, -1)
img = cv2.flip(img, 0)
gray = cv2.cvtColor(img, cv2.COLOR_BGR2GRAY)
faces = face_detector.detectMultiScale(gray, 1.3, 5)
for (x, y, w, h) in faces:
cv2.rectangle(img, (x, y), (x + w, y + h), (255, 0, 0), 2)
count += 1
cv2.imwrite(
"dataset/User." + str(face_id) + "." + str(count) + ".jpg",
gray[y:y + h, x:x + w],
)
cv2.imshow("image", img)
k = cv2.waitKey(100) & 0xff
if k == 27 or count >= 30:
break
cam.release()
cv2.destroyAllWindows()
|
课程版本为每个人采集约 30 张样本。采集时应缓慢改变角度和表情,并避免所有照片几乎完全相同。
运行:
1
| python3 01_face_dataset.py
|
3、训练 LBPH 模型
02_face_training.py 读取文件名中的人员 ID,将灰度图像转换为 NumPy 数组,再训练 LBPH 识别器。课程源码中的核心函数如下:
1
2
3
4
5
6
7
8
9
10
11
12
13
14
15
16
17
18
19
20
21
22
23
| recognizer = cv2.face.LBPHFaceRecognizer_create()
detector = cv2.CascadeClassifier("haarcascade_frontalface_default.xml")
def getImagesAndLabels(path):
imagePaths = [os.path.join(path, f) for f in os.listdir(path)]
faceSamples = []
ids = []
for imagePath in imagePaths:
PIL_img = Image.open(imagePath).convert("L")
img_numpy = np.array(PIL_img, "uint8")
id = int(os.path.split(imagePath)[-1].split(".")[1])
faces = detector.detectMultiScale(img_numpy)
for (x, y, w, h) in faces:
faceSamples.append(img_numpy[y:y + h, x:x + w])
ids.append(id)
return faceSamples, ids
faces, ids = getImagesAndLabels("dataset")
recognizer.train(faces, np.array(ids))
recognizer.write("trainer/trainer.yml")
|
运行:
1
| python3 02_face_training.py
|
训练完成后应确认 trainer/trainer.yml 已生成,并记录实际参与训练的人员数量和样本数量。
4、实时识别
03_face_recognition.py 加载 trainer.yml,对摄像头中的每个人脸执行预测:
1
2
3
4
5
6
7
8
9
10
11
12
13
14
15
16
17
18
19
20
21
22
23
24
25
26
27
28
| recognizer = cv2.face.LBPHFaceRecognizer_create()
recognizer.read("trainer/trainer.yml")
faceCascade = cv2.CascadeClassifier("haarcascade_frontalface_default.xml")
names = ["None", "Marcelo", "Paula", "Ilza", "Z", "W"]
faces = faceCascade.detectMultiScale(
gray,
scaleFactor=1.2,
minNeighbors=5,
minSize=(int(minW), int(minH)),
)
for (x, y, w, h) in faces:
cv2.rectangle(img, (x, y), (x + w, y + h), (0, 255, 0), 2)
id, confidence = recognizer.predict(gray[y:y + h, x:x + w])
if confidence < 100:
id = names[id]
confidence = " {0}%".format(round(100 - confidence))
else:
id = "unknown"
confidence = " {0}%".format(round(100 - confidence))
cv2.putText(img, str(id), (x + 5, y - 5), font, 1,
(255, 255, 255), 2)
cv2.putText(img, str(confidence), (x + 5, y + h - 5), font, 1,
(255, 255, 0), 1)
|
LBPH 返回的值更接近“距离”,数值越小通常表示越相似。课程代码把它转换成便于展示的百分比,但这个百分比不是经过严格校准的真实概率。
运行:
1
| python3 03_face_recognition.py
|
人员 ID 与姓名通过脚本中的列表映射。应保证列表索引与采集时输入的数字 ID 一致。
5、完整运行顺序
1
2
3
4
| cd OpenCV_Facial_Recognition
python3 01_face_dataset.py
python3 02_face_training.py
python3 03_face_recognition.py
|
重新采集或新增人员后,需要再次运行训练脚本,生成新的 trainer.yml。
6、测试建议
| 测试 |
目的 |
| 同一人、相似光照 |
验证基本识别链路 |
| 同一人、不同角度 |
观察姿态变化影响 |
| 同一人、不同光照 |
观察光照鲁棒性 |
| 未登记人员 |
检查未知人员阈值 |
| 多人同时出现 |
检查检测和显示逻辑 |
| 遮挡或远距离 |
记录失败边界 |
不要只用训练时同一位置、同一光照下的画面测试,否则结果会显得很好,却不能说明模型具有泛化能力。
7、实现边界与改进
- 当前实现是 Haar + LBPH 的轻量课程方案。
- 没有经过独立测试集、交叉验证或标准数据集评估。
- 没有活体检测,照片或屏幕攻击可能绕过识别。
- 没有数据库、身份权限和隐私数据管理。
后续可在电脑端比较深度特征模型、SVM、PCA 或人脸反欺骗方法,但应把扩展实验与树莓派上的实际可复现版本分开记录。

 微信
微信 支付宝
支付宝